Creating an embeddable HTML snippet with Django and WebComponents
This article aims at creating a basic understanding of how we generated a HTML snippet with dynamic content which is embeddable on any external site.
A comparable solution is the Twitter post embedding functionality. In our case the content of the embeddable snippet is a list of job offering entries which contains an application link.
Our situation
We have a plattform written in Python / Django which is responsible for letting the user creating and managing job offers for their company. On our platform are multiple companies who are supposed to manage their offers. There are two specific usecases the snippets are aiming at.
- Generate a HTML snippet of all jobs on the platform
- Generate a HTML snippet of all jobs of one specific company on the platform
The idea behind those snippets is that they can be embedded on either public pages which list all job offers or for example on specific sites of a company itself (e.g. their own website). So advertisment and distribution of those offers shall primarily happen via HTML snippet embedding.
The management of all job offers happens via our internal platform. The management process of those offers are merely basic CRUD operations and are self explanatory from a technical standpoint. A job offer contains basic fields like a title, a description, some tags and information about the company which is responsible for the offer.
Our approach
After some research we found out that the common way of doing this is via JavaScript. Basically this is pretty self explanatory if you think about it. The code snipped which takes care of the injection looks like the following:
<div id="unique-jobs-id" class="job-class"></div>
<script async src="https://your-url/jobsapi/v1/widget/" charset="utf-8"></scriptThis is the part the webmaster of the site who wants to embed the offers has to add to his page. Everything else will be handled by JavaScript.
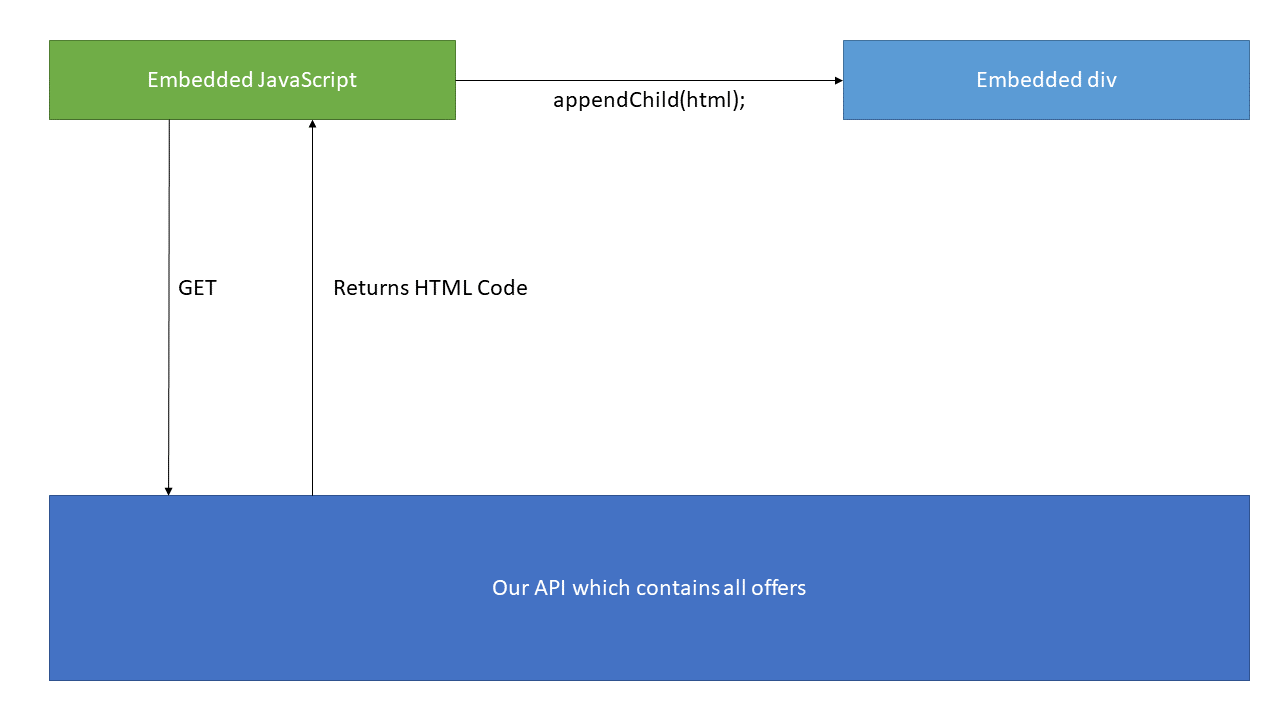
We have a div which serves as container for the list we want to embed. Also we have script which is called asynchronously (so that loading of the rest of the site is in no case blocked by our script). The script fetches the HTML code which contains a list of all job offers and then injects it into the div by an id query selector.
This image should boil down what happens.
Challenges & Considerations
In theory the sketched approach from above seems pretty straight forward. How ever I wanted to emphasize on some things we discussed internally as well as challenges we faced during implementing the approach from above.
- HTML/CSS class interference
What I mean by that is that the retrieved HTML code from our server may interfere which HTML or CSS code which is already applied on the parent site. The snippet CSS code is embedded into the parent site. Imagine two elements having the same class (for instance .job-list). The retrieved CSS from our API would therefore also apply CSS styling to the parent page and therefore could break the layout of the parent page. This should be kept in mind and ideally should not be possible.
The two easiest solution for that are probably either prefixing every class with a value or using WebComponents with a Shadow DOM. If you prefix all classes with a unique value there is still a little chance that there might be an interference. That is why we went for an open Shadow DOM solution. More on that down below.
2. The HTML Code needs to be generated serverside and be embeddable
For our solution it is neccessary that we retrieve HTML Code from our server which we just can inject into the target site. With Django this was pretty easy since we just could use server side rendering with a Django partial for that.
It would also be possible for instance to return JSON data and generate the needed HTML code with JavaSript on the client side. How ever that felt more tedious for us to do so. So we decided to just append the retrieved HTML code with JavaScript. Also it is important that we add as little JavaScript as neccessary to ensure the parent site performance feels well.
Implementation
On our Django server we have two endpoints:
urlpatterns = [
path("widget/<uuid>/", job_widget, name="jobs_api.widget"),
path("jobs/<uuid>/", joblist, name="jobs_api.joblist"),
]
The uuid part is added for multitenancy support. So in case we want to support two different versions of the JavaScript part or just provide a subset of job offers.
The widget endpoint is responsible for delivering the JavaScript part (in our case the JavaScript code for the WebComponent). It looks like the following:
def job_widget(request, tenant_uuid):

	link = f"{request.scheme}://{request.get_host()}{reverse('jobs_api.joblist', args=[tenant_uuid])}"
return render(request, "jobs_api/job-widget.js", {"link": link, "tenant_uuid": tenant_uuid}, content_type="application/javascript")As you can see we are sever side rendering the job-widget.js part instead of just providing it statically. This is for once because of the tenant_uuid for multi tenant support as well as that we are injecting the generated link from above into the script. We do that so that we do not have to hardcode the URL where the JavaScript part fetches the jobs from into the file itself. In case you have a testing or staging system delivery is much easier.
Furthermore we have the endpoint which returns the JobList as HTML. This ofcourse heavily depends on what you want to return. To keep it simple and understandable we stripped some parts of our code here. The example should still be fully comprehensible.
def joblist(request, tenant_uuid):

    jobs = []
    filtered_for_company_id = request.GET.get("c")

    jobs = Job.objects.filter(tenant__uuid=tenant_uuid)

    if filtered_for_company_id:
        company = get_object_or_404(Company, id=filtered_for_company_id)
        jobs = jobs.filter(published_by__company=company)

    jobs = jobs.order_by("-published_on")
    return render(
        request,
        "jobs_api/joblist-snippet.html",
        {"joblist": jobs},
        content_type="text/html",
)As you can see we basically return a HTML filled with the job offers. As addition we also check for an URL parameter called c to filter job offers of a specific company. This how ever is really additional and not neccessary.
The rendered HTML file is a simple Django partial with a foreach loop. To keep this article short and informative I will not go in detail about this.
The WebComponent
I also do not want to discuss WebComponents in general. As mentioned before the main benefit for us is the encapsulation from the environment where we want to add our snippet to ensure minimal interference from the parent site. If you want to read about it a good starting point is here.
Lets take a look at the JavaScript part which fetches and embeds the HTML part from above into our component.
const url = "{{link}}"; //Injected from Django
const template = document.createElement('template');
class JobSnippet extends HTMLElement {
    constructor() {
        super();

        const shadowRoot = this.attachShadow({mode: 'open'});
        shadowRoot.appendChild(template.content.cloneNode(true));
    }

    connectedCallback() {
        let shadowHost = this.shadowRoot;
        const btns = shadowHost.querySelectorAll('.jobs-show-job-details');

        btns.forEach(element => element.addEventListener('click', function (event) {

            // You can add custom JavaScript functionalities to your WebComponent
            let targetElement = event.target;
			console.log(targetElement);

        }));
        console.log(`Jobsnippet: JobSnippet added to page`);
    };

};

window.customElements.define('job-snippet', JobSnippet);

try {
    const jobDiv = document.getElementById('jobs-{{tenant_uuid}}');

    fetch(url)
        .then((response) => {

            if(response.status == 200) {
                response.text().then((html) => {
                    template.innerHTML = html;
                    const jobSnippet = new JobSnippet();
                    jobDiv.appendChild(jobSnippet);
                });
            }
            else{
                console.error('Could not embed snippet')
                response.text().then((error) => console.error('Jobsnippet: ' + error));
            }
        });
    } catch (error) {
        console.error(error);
} As you can see a lot of stuff is happening here. Lets start at the very bottom of the script:
try {
const jobDiv = document.getElementById('jobs-{{tenant_uuid}}');

fetch(url)
    .then((response) => {

        if(response.status == 200) {
            response.text().then((html) => {
                template.innerHTML = html;
                const jobSnippet = new JobSnippet();
                jobDiv.appendChild(jobSnippet);
            });
        }
        else{
            console.error('Could not embed snippet')
            response.text().then((error) => console.error('Jobsnippet: ' + error));
        }
    });
} catch (error) {
    console.error(error);
}This part is responsible for fetching the HTML code we prepared on our server before. We injected the url we need into our script by Django. Now we simply call that URL to retrieve the HTML code. If the call is successful with a 200 we take the response and set the innerHTML of our template element, create the JobSnippet and append it to the div we inserted together with our script. Otherwise we will log the error.
The template element is basically the first thing which is created by our script and serves as a container for our WebComponent. It is special and important for WebComponents. You can read more about it here.
Lets take a look:
const template = document.createElement('template');
class JobSnippet extends HTMLElement {
    constructor() {
        super();

        const shadowRoot = this.attachShadow({mode: 'open'});
        shadowRoot.appendChild(template.content.cloneNode(true));
    }

    connectedCallback() {
        let shadowHost = this.shadowRoot;
        const btns = shadowHost.querySelectorAll('.jobs-show-job-details');

        btns.forEach(element => element.addEventListener('click', function (event) {

            // You can add custom JavaScript to your WebComponent
            let targetElement = event.target;
			console.log(targetElement);

        }));
        console.log("Jobsnippet: JobSnippet added to page");
    };

};As you can see we create a class names JobSnippet which extends HTMLElement. This is responsible for creating a WebComponent. It is called a custom element. Inside the constructor of this element is important that the super() always needs to get called first.
In the following we declare our Shadow DOM for our custom element:
const shadowRoot = this.attachShadow({mode: 'open'});
This line creates s shadow DOM for us with the open mode. Open means that our custom element is still reachable from outside of the element via JavaScript. This can be useful for instance if the person who embeds the snippet needs to apply JavaScript to our custom component. You could also set the mode to closed. In that case the shadow root is not accessible via JavaScript from the outside.
shadowRoot.appendChild(template.content.cloneNode(true));
This adds our retrieved HTML content into our shadow root. Inside the the connectedCallback() function you can add all the functionalities you need to your component. This function gets called after the component has been attached to your page. In our demonstration case we add an onclick functionality to all buttons with a certain class.
The last important part for our custom element is this line:
window.customElements.define('job-snippet', JobSnippet);
This is neccessary to register our custom element and to complete the creation of our custom component.
Conclusion
To summarize things I can say that using a WebComponent for our task felt like the right decision. If you have never worked with WebComponents before the JavaScript setup of it might be a bit confusing but afterwards you will get an understanding pretty quickly. It is really helpful that you can control with the component mode (open or closed) whether the component is accessible from outside via JavaScript or not. The encapsulation feels very useful for purposes like snippet embedding.
What I think is also still worth mentioning that independent of the component mode the parent site is still able to override the styling ob the custom element with a special selector. Basically you can use the pseudo element ::part for accessing the stylings of the shadow DOM. You can read more about it here.
Accessing the styling from the parent site can look like the following:
snippet::part(job-entry-wrapper) {
		color: blue;
}This would change the color of the part job-entry-wrapper inside the component job-snippet to blue. It is important to define those parts in your WebComponents HTML:
<div class="jobs-job-conent" part="job-entry-wrapper">
Overall we are pretty happy how things worked out. There were no major confusions or hickups. The implementation worked well and after digging a bit into the WebComponent part I'd would probably do it the same way in the future. Creating the HTML code server side seemed also like the right decision since we could easily integrate it into our custom element.